How to Preserve Strawberries: Freeze, Can, and Enjoy All Year
The fleeting joy of peak-season produce is a culinary delight, but what if you could extend that vibrant freshness, flavor, and nutritional power long after the harvest? Imagine biting into a juicy strawberry in the dead of winter, or adding a burst of sweet-tart flavor to your breakfast, all thanks to a little foresight and effort. This guide will walk you through the most effective and delicious methods for
preserving strawberries kale and basil, ensuring your pantry and freezer are stocked with summer's bounty all year long. From simple freezing techniques to the satisfying art of canning jam, and even clever ways to save your greens, get ready to transform your kitchen into a year-round produce paradise.
The Sweet Secret: Freezing Strawberries for Year-Round Delight
Freezing is undoubtedly one of the easiest and most versatile ways to preserve strawberries. It locks in their natural sweetness and vibrant color, making them perfect for smoothies, desserts, sauces, and more, up to a year after they’ve been picked. This method minimizes effort while maximizing the enjoyment of fresh fruit whenever the craving strikes.
To begin, selecting the right berries is crucial. Choose fully ripe, firm strawberries with a deep red color, free from blemishes or soft spots. Discard any immature or defective fruit; quality in equals quality out!
Here’s a simple, step-by-step guide for basic freezing:
- Wash Thoroughly: Rinse your strawberries under cool running water. Be gentle to avoid bruising, but make sure to remove any dirt or debris. Pat them dry with a clean towel or allow them to air dry completely.
- Hull Them: Hulling means removing the green tops and the small, firm core. While special tools exist, a small knife or even your fingernails can do the job effectively. Aim to remove as little of the red flesh as possible.
- Flash Freeze: This step is key to preventing your berries from clumping together into one giant frozen block. Arrange the hulled strawberries in a single layer on a baking sheet lined with parchment paper. Make sure they aren't touching each other. Place the baking sheet in the freezer for 2-4 hours, or until the berries are completely frozen solid.
- Bag and Store: Once flash-frozen, transfer the solid berries into freezer-safe bags or airtight containers. Squeeze out as much air as possible from the bags to prevent freezer burn. Label with the date.
When you need them, simply pull out the desired amount of frozen strawberries and use them directly in recipes. They’re fantastic for smoothies, adding to yogurt, or even thawing slightly for a quick topping for pancakes or ice cream. For an even deeper dive into specific techniques, including various pack methods, you might find more detailed insights in resources about
how to make kale cubes and freeze strawberries for year-round flavor.
Beyond basic freezing, you can also opt for sugar or syrup packs, which can help maintain texture and color, especially for dessert applications.
- Sugar Pack: For every quart (about 1 1/3 pounds) of whole, sliced, or crushed strawberries, add ¾ cup of sugar. Mix gently until most of the sugar dissolves, or let stand for 15 minutes. Pack into containers, leaving a little headspace.
- Syrup Pack: For whole berries, pack them into containers and cover them with cold 50 percent syrup (equal parts sugar and water, heated until sugar dissolves, then chilled).
These methods are particularly good if you plan to use your strawberries in baked goods or cooked dishes where a slightly sweeter, more preserved texture is desired.
Master the Art of Canning Strawberry Jam
Canning strawberry jam is a time-honored tradition that yields a delightful spread, perfect for toast, pastries, or even as a glaze for savory dishes. As strawberries are high-acid foods, they can be safely processed using a boiling water canner or an atmospheric steam canner, making it an accessible preservation method for home cooks.
The magic of homemade jam lies in its intense flavor, far surpassing store-bought varieties. Here’s how to create your own batches of luscious strawberry jam:
Equipment and Preparation:
Before you begin, gather your supplies: a large stockpot for the jam, a boiling water canner with a rack, canning jars (half-pint or pint are ideal), two-piece canning lids, a jar lifter, a funnel, and a ladle.
Wash your canning jars with warm, soapy water and rinse thoroughly. Sterilize them by boiling them in water for 10 minutes, then keep them hot in the canner until you’re ready to fill them; this prevents thermal shock when introducing hot jam. Prepare two-piece canning lids according to the manufacturer’s directions, usually by simmering in hot (not boiling) water.
Ingredients for Strawberry Jam with Powdered Pectin:
- 5½ cups crushed strawberries (approx. 3-quart boxes of fresh strawberries)
- 1 package powdered pectin
- 8 cups sugar
This recipe typically yields about 9-10 half-pint jars.
Jam Making Process:
- Prepare Berries: Sort through fully ripe, firm berries with a deep red color, discarding any underripe or defective fruit. Wash them gently, remove stems and caps, then crush the berries. A potato masher works wonderfully for this.
- Combine and Heat: In a large, heavy-bottomed pot, combine the crushed berries and pectin. Stir well to ensure the pectin is evenly distributed. Place the pot on high heat and, stirring constantly to prevent sticking, bring the mixture quickly to a full, rolling boil that cannot be stirred down.
- Add Sugar and Boil Hard: Once at a full boil, add all 8 cups of sugar at once. Continue stirring vigorously and bring the mixture back to a full, bubbling boil. Boil hard for exactly 1 minute, stirring constantly to prevent scorching.
- Skim and Fill: Remove the pot from the heat. Skim off any foam that has risen to the surface with a spoon. Immediately ladle the hot jam into your hot, sterile canning jars, leaving ¼ inch of headspace from the rim. This headspace is crucial for proper sealing.
- Seal and Process: Wipe the rims of the jars with a dampened clean paper towel to remove any sticky residue. Adjust the two-piece metal canning lids until they are fingertip tight (just until resistance is met, no need to overtighten).
- Canning: Carefully place the filled jars onto the rack in your boiling water canner, ensuring they are fully submerged by at least an inch of water. Bring the water back to a rolling boil and process half-pint or pint jars for 5 minutes at altitudes less than 1,000 feet sea level. Adjust processing time for higher altitudes if necessary.
Once processed, turn off the heat, remove the canner lid, and let the jars sit for 5 minutes before carefully removing them with a jar lifter. Place them on a towel-lined counter, allowing them to cool undisturbed for 12-24 hours. You should hear a satisfying "ping" as the lids seal. Check seals by pressing on the center of the lid; if it doesn't flex, it's sealed. For more comprehensive guides on strawberry preservation methods, including various jam and freezing techniques, consider exploring resources on
strawberry preservation methods: jam, freezing, and syrup packs.
Beyond Berries: Preserving Kale and Basil
While strawberries often steal the show,
preserving strawberries kale and basil together offers a comprehensive approach to year-round culinary enjoyment. Kale and basil, much like strawberries, burst with flavor and nutrients when fresh, and with a little effort, you can extend their life significantly.
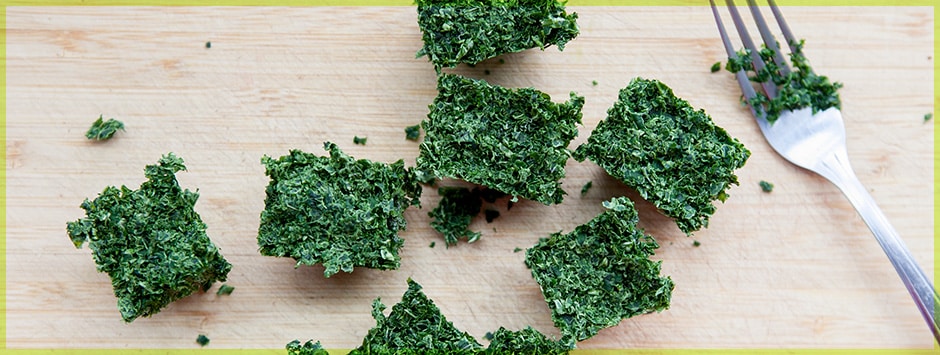
Kale Cubes: A Green Powerhouse at Your Fingertips
Kale is a nutritional powerhouse, but it can be challenging to consume all of it before it wilts. Freezing kale into convenient cubes is a brilliant way to preserve its goodness and reduce food waste. These cubes are perfect for adding to smoothies, soups, stews, or sauces without needing to thaw.
The process is remarkably simple:
- Wash and Chop: Thoroughly wash your kale leaves, removing any tough stems. Chop the kale finely.
- Pack into Trays: Tightly pack the chopped kale into ice cube trays. Don't add any water or oil at this stage – it’s just pure kale!
- Freeze: Place the trays in the freezer until the kale is completely frozen solid.
- Store: Once frozen, pop the kale cubes out of the trays and transfer them to freezer-safe bags or airtight containers. Label with the date.
When you need a boost of greens, simply drop a few kale cubes directly into your cooking or blend them into your morning smoothie. They dissolve beautifully, infusing your dishes with nutrients and a mild kale flavor.
Basil's Aromatic Embrace: Freezing and Oil Infusions
Basil, with its sweet, peppery aroma, is a quintessential summer herb. Preserving basil allows you to enjoy its distinct flavor long after the garden harvest.
- Freezing Basil in Olive Oil: This method keeps basil vibrant and flavorful. Wash and dry basil leaves thoroughly. Finely chop the basil or pulse it lightly in a food processor. Pack the chopped basil into ice cube trays, then pour olive oil over the basil to cover it completely. Freeze until solid. Once frozen, transfer the basil-oil cubes to freezer bags. These cubes are perfect for sautéing, adding to pasta sauces, or infusing dressings.
- Homemade Pesto Cubes: Make a fresh batch of your favorite basil pesto. Spoon the pesto into ice cube trays and freeze. Once frozen, transfer to freezer bags. Pesto cubes are incredibly convenient; simply thaw a cube or two for a quick pasta dish, sandwich spread, or even a flavorful addition to soups.
- Drying Basil: For a more traditional approach, you can air dry basil. Tie small bunches of basil together and hang them upside down in a warm, dry, well-ventilated area away from direct sunlight. Once completely dry and crumbly, strip the leaves from the stems and store them in an airtight container. Dried basil is excellent for seasoning cooked dishes like stews, marinades, and roasts.
Maximizing Flavor and Minimizing Waste
Successful food preservation isn't just about following recipes; it's about embracing a mindset of maximizing flavor and minimizing waste. When you commit to
preserving strawberries kale and basil, you're investing in a year-round culinary experience. Always start with the freshest, highest-quality produce you can find. Local farmers' markets are often treasure troves of ripe fruits and vegetables perfect for preservation.
Remember to properly label all your preserved goods with the date and contents. This helps you track shelf life and organize your pantry or freezer efficiently. Get creative with your preserved ingredients! Frozen strawberries can become a quick compote, kale cubes can fortify a winter soup, and basil oil cubes can kickstart a flavorful pasta sauce.
Conclusion
Embracing the art of food preservation allows you to capture the peak flavors of summer and enjoy them throughout the year. Whether you’re freezing juicy strawberries, crafting homemade jam, or saving the goodness of kale and basil, these methods empower you to extend the freshness of your garden or local market haul. Not only do you reduce food waste, but you also ensure a continuous supply of nutrient-rich, delicious ingredients for your family. So, gather your produce, roll up your sleeves, and embark on your journey of preserving, canning, and ultimately, enjoying the fruits (and greens!) of your labor all year long.